Showing posts with label Wishblade. Show all posts

Thursday, March 4, 2010

Fernando Frame Layout

My friend Nancy asked me to do this as a birthday gift for her husband, whose brother passed away in 2001. It was an honor to work on something so special for her, and I hope I did his memory justice. I always worry about that when I work on things like this. She emailed me and told me she liked it, and had two more for me to do, which was the best compliment she could have given me I think. I used paper from DCWV Old World Stack for the blue. I used brown and grey cs I had on hand. I stamped the edge of the blue paper with a swirl stamp from 7 Gypsies Nottinghill set, and used quite a few stamps from Autumn Leaves Gypsy Style. I used Burgundy stickles to pop those stamps and add color. I used rhinestones in the corners and between the smaller pictures, added red eyelets to the black ribbon as well as a stick pin. I cut the letters in grey cs, added multiple shades of blue and more, then matted them on brown cs. Added the frame and 10 hours later, I was done :) Close up of the letters, I was pretty happy with how they turned out. I'm not a good judge when it comes to the color blue, so it took me a little work to make it likable for me, but in the end, I was pretty happy with the results. Thanks for stopping by!

Friday, February 12, 2010

Carter's Valentine Mailbox - Lightning McQueen

A few years back I made the three older kids each a mailbox to use for the Valentine party at school. Carter wasn't in school yet, so I didn't worry about it. The kids informed me last week that it was time he had one as well, so I spent some time at the beginning of the week working on his. He's always loved cars, and when the Disney movie Cars came out he was in heaven. That was quite a few years back and he still loves the movie and characters. It wasn't a surprise when he requested a Lightning McQueen mailbox. It was a lot of fun to do, and it actually turned out better than I thought it would. I love it when that happens. It's not perfect, and I spent way too much time on it. It's for a kindergartner, I hope it lasts longer than it took to make it! This is the back (I always forget the pics load backwards or something and I'm in too much of a hurry to redo them. Sorry.) You can see the wheels, the bolt, and his number from this angle too. All of the elements that went into making this were flat when I started. Mod podge is a wonderful thing for projects like this. I created the shape with chipboard, then covered with paper, and embellished away. Obviously, this is the front. I was pretty happy with the way his eyeballs turned out :) Love that white paint pen! I colored the lightning and the bolt with my prismas, the numbers got a little more color treatment with a red marker so they stood out a little more. I used my wishblade to design and cut out his features and decorations.
Carter with his new mailbox. He gets to use it today.
My little goofball. Gotta love'em.
Thanks for stopping by!

Monday, February 1, 2010

More Mermaid Cards

As you may know, I've been sending mermaid cards to my brother at boot camp. He's in the Navy, and in my round about way, I think mermaid cards are perfect for sailors. Can you call him a sailor if he's going to be working on a sub? Dunno. Anyway, I used my prismacolor pencils on all of them, as well as stickles for their bling. I used my wishblade to cut out frames and anchors and words. The mermaids are from Coronado Island Designs and the ship's wheel (I don't know what they're called) is from there as well. The anchor is from Jen Adkins, a designer at paperthreads.com. I think that's all.
Thanks for stopping by!

Thursday, January 7, 2010

More Cards

These next two cards I did for some friends of ours. I was able to scan this image in so wishblade could cut it out for me, I added the text before the printing. Then I colored with my prismas and let my wishblade cut it for me. Scanned in this image, played with it in wishblade, printed, colored, then cut out this design around it. I love the print and cut feature!
I made this for my bil, he had our name for Christmas and I wanted to thank him. I put four penguins, one for each of my kids. The penguins are a digital stamp from AngelsLanding.com. I designed the background in elements and added the penguins, printed the card, then colored the cutie pie penguins. They're adorable - even before coloring!
Images c Judi Maddigan for AngelsLanding.com
I did this up for Mary Lee, of Serendipity Stamps who went above and beyond in the customer service department for me. Thanks Mary!
I know this sounds odd, but I did this one for my brother at boot camp, but hear me out. Mermaids = Water Water = Navy - see how my mind works? Boot camp is tougher than he thought it would be, so I wanted to encourage him, and this is the card I tried to do it with. Inside I listed all the things he should believe in, including himself. The stamp is from Coronado Island Designs. Of course I used my prismas to color her, and I cut out the word Believe with my wishblade, added it, then stickled them. I also used stickles on her tail, as well as her jewelry, which you can't really see unless you click on it for a larger view. I also discovered something...cropping a white card on white background is not easy! I can see room for improvement, but oh well.
Thanks for stopping by!

Some December Work that Kept Me Busy

As a gift for a friend to use as a gift. Does that make sense? She wanted it earlier in the year, but I wasn't able to do it then, so I decided to surprise her for Christmas :) This is my first try at making a single page layout designed for framing and hanging. I played with the pics a little in elements and added the framing and the backgrounds. The monkeys (leaves and bananas) are stamped, colored with prismacolor pencils, and then cut out. All the words are done with my wishblade. Without the frame: With the frame. These frames are made specifically for scrapbook pages. They accommodate layering and many 3-D embellishments. You can't tell, but this is a giant poster I made for our women's get together for December. We made arrangements with a local women's shelter to come in and decorate for Christmas, bring a full Christmas dinner, Santa showed up, and then we worked on a craft with the women and children. I snuggled a baby and rocked him to sleep instead of helping with the craft though. It was a wonderful night. This is our third year, and I think there will be many more to come. I used a gingerbread house file from Butterfly Designs (found on paperthreads.com) to make the house, but I had to be tricky because of the size, but I did it. This is just a simple card I did for Emma's guitar teacher. She seemed to like it.
That's part of what kept me busy during December.
Thanks for stopping by!

Monday, August 24, 2009

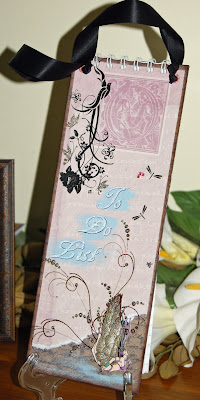
Inspire & Imagine - To Do List Hanging

I needed some way to use the notebook paper I cut for the little 4x6 notebook, so I figured to do list (or shopping list in my case) would work. So, this is a companion for the following notebook. I incorporated the same elements in both projects, although the angels are just a bit different. I attached the ribbon for hanging. Sorry about the strange angle, but the glare from the flash was annoying.
Rub ons from Holy Cow, I embellished them with a gel pen and stickles.
Again, I used my wishblade to cut out the letters and then I stickled them. They show up bluer than they really are, I think they're just reflecting the blue from the flash and the background.
Again, I used a the angel from Coronado Island, as well as a flourish from Inkadinkado. I'm kind of jealous that my friend gets this...I can't make another one like it. I have no idea where I got the paper and I don't know if I can get the same rub on transfers - so this is a one of a kind :)
A close up of the angel, I'm happy with how she turned out...and it started with a great stamp.
All three items together.
Thanks for stopping by!

Inspire & Imagine - Card

Remember the stamps I couldn't find the foam to mount? Well, thanks to Mary of Serendipity Stamps, I've got foam, and all my newly aquired stamps are mounted and ready to go! Here's a card I made with one of the mermaids I got. The stamp is from Coronado Island Desingns and Stamps, they have a whole collection of mermaids and I need nearly every single one of them! This card is for a friend, and there's some other things for her too, I hope she likes it :) I used my wishblade to cut out the words and then stickled them :) I used my prismacolor pencils for her, and I'm very excited with how it turned out! I love how the stickles enhanced it.